How To Mummify A Tomato - Egyptian Mummification Activity For Kids
- Aug 4, 2025
- 5 min read

The Ancient Egyptians used a process called Mummification to preserve the bodies of dead people (mostly royalty and rich people!). The aim was for the body to stay in tact for thousands of years after the person had died.
If you're learning about Ancient Egyptian Mummification and you're wondering how it works, this easy, child-friendly mummification activity will help you out. Here, we're mummifying a tomato - but you can mummify a whole bunch of random food items including apples, oranges and even hot dogs! We'll be using the same techniques the Ancient Egyptians used on the Pharaohs thousands of years ago. We'll even give you a few facts on how the Egyptians would have done it with each step of the activity.
So what are you waiting for? Let's get mummifying!
You Will Need:
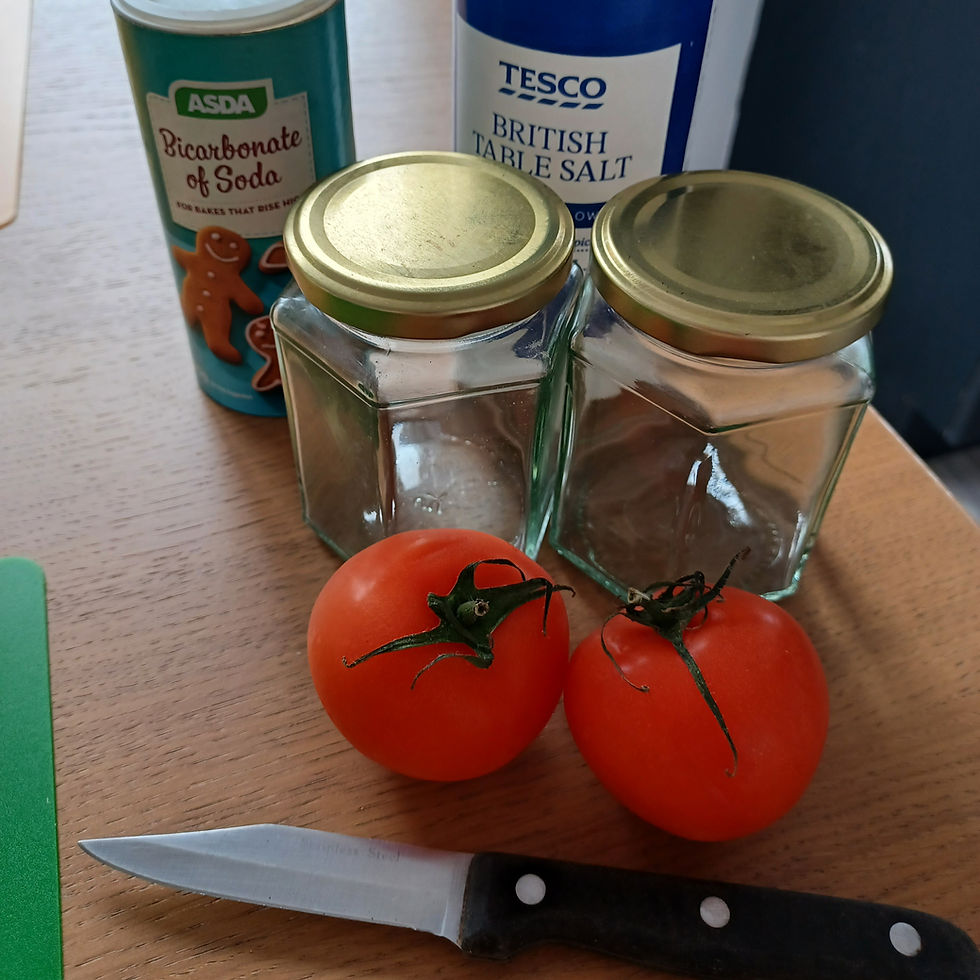
Two tomatoes
A knife (always get an adult to help you when using knives)
A spoon
Handwash (and water from a sink!)
Kitchen roll
Salt
Bicarbonate of soda or baking powder
Two jars or glasses (big enough to fit a tomato in)
Warning!
Do not eat either of your tomatoes during or after this experiment.
Get an adult to help you when using a knife.
Make sure to thoroughly wash your hands after touching either of your tomatoes.
How to Mummify a Tomato

Before You Start:
Choose one of your tomatoes to mummify. Weigh this tomato and make a note of the weight.
Step 1 - Cutting and Gutting


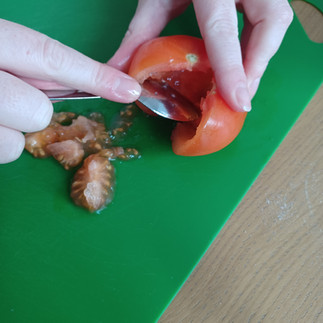

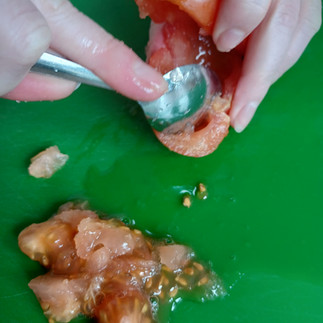


The ancient Egyptian embalmers would start by making a small cut in the side of the Pharaoh's torso. Then they would take all of the Pharaoh's organs and fleshy bits out through this hole! Gross! The liver, heart, lungs and intestines would be placed inside Canopic Jars.
Get an adult to help you with this step!
Using your knife, carefully make a cut down one side of your tomato. Use your fingers to gently open out the tomato so you can get to the insides.
Next, using your spoon, scrape out all of the pulp and seeds from inside the tomato. You don't need the insides anymore, you can throw them in the bin. Or if you're feeling really creative, you could craft your own Canopic Jars to put these bits in!
Step 2 - Wash and Dry


The ancient Egyptians would wash the body of the Pharaoh using palm wine or using sacred water from the river Nile. This would get rid of any germs and stop bacteria from rotting the body.
Take your tomato over to the sink and give it a good wash (inside and out) using your handwash.
Rinse away any soapy residue and thoroughly dry the tomato with the kitchen roll.
Step 3 - Pack With Natron


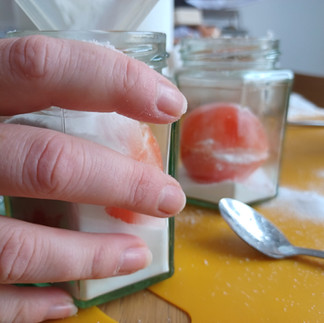


The ancient Egyptian embalmers would pack out the body with a special type of salt called natron. They'd also use dry rags and nice smelling herbs and spices.
Make the natron by mixing together your salt and bicarbonate of soda (or baking powder). You'll need enough to fill one of your jars or glasses.
Using your spoon, fill the tomato with natron. Close the outside of the tomato around the natron and pop it into a jar or glass.
Fill the remaining space in the jar or glass with natron and make sure the tomato is completely covered.
Put your second tomato into the second jar or glass just as it is. Don't do anything else with it! This is your control tomato to show you if the mummification has worked.
Step 4 - Leave to Dry
The ancient Egyptians would leave the Pharaoh to dry out in a bath of natron for 40 days.
Pop the lids on your jars (if you have them).
Store your tomatoes in their jars or glasses somewhere out of the way (ideally in a dry place like a cupboard) for at least two weeks. Make sure it's somewhere safe where it won't get knocked or disturbed, away from food preparation areas,
Check the jars occasionally. If the salt mixture has become too wet, you may need to replace it for a fresh mix.
Can you keep your tomatoes drying out in their jars for a full 40 days?
Step 5 - View the Results


The ancient Egyptians would clean the Pharaoh's body of natron and moisturise it with oils before starting the wrapping process.
Warning: Do not eat either of your tomatoes. If there is signs of mould or decay, avoid touching them.
Carefully take your mummified tomato out of the jar.
Inspect the mummified tomato to see how it's changed.
How does the skin look?
Has it changed colour?
Is there any mould?
What does it feel like?
Are you brave enough to smell it?
Compare the mummified tomato to the control tomato. (We recommend keeping the control tomato safely in the jar until you bin it! We got ours out but it smelled really bad and had mouldy bits on it! Eww!).
How has the control tomato changed compared to the mummified tomato?
If you have a fresh tomato to hand, you could compare this to your mummified tomato too!
Finally, weigh your mummified tomato again.
Has it's weight changed from the beginning of your experiment?
If so, why do you think this has happened?
Findings


We found that our mummified tomato was a much lighter weight than it was at the start. This isn't just because we scraped the pulp and seeds out. The salt draws the water out of the tomato. So the tomato is lighter because it has much less water in it. This helps to preserve the tomato because the bacteria and mould need the water to break the tomato down and cause it to rot (this is what happened to our control tomato).
More than 60% of the human body is made up of water. By using salt to remove the water from the Pharaoh's body, the ancient Egyptian embalmers stopped the body from rotting. This meant that the body would be preserved and stay in tact for thousands of years.
Our mummified tomato had also changed colour and had shrunk in size. The skin looked wrinkled and felt leathery to the touch. There was no mould and it actually didn't smell at all! A good sign that it has been well preserved by our salt mixture.
Step 6 - Tidy Up
Dispose of your tomatoes and salt mixture responsibly by putting them into your general waste bin.
Give your workspace a good clean with anti-bacterial cleaner. Clean any glasses or jars thoroughly before using them again.
Make sure to thoroughly wash your hands after touching either of your tomatoes.
Remember: Do not eat either of your tomatoes during and after this experiment.
Find out more:
If you're loving learning about mummification through interactive activities, we have a bunch more exciting crafts based on Ancient Egyptian Mummification here.
And if you want a more detailed breakdown of the Mummification process, you can check out our Step-By-Step Guide To Egyptian Mummification For Kids. This 12-step guide takes you through everything you need to know at Keystage 2.
Or if reading isn't your thing, don't worry - we have a fun video on the mummification process right here.


