Make a Viking Helmet - Crafts for Kids
- Jun 14, 2021
- 6 min read
Updated: Mar 27, 2025

Viking helmets were very simple and easy to construct. They were often a bowl-shape (occasionally with a peak in the centre) with a nose or face guard attached to the front. This type of helmet is now referred to as a “Spangenhelm” or “segmented helmet”. Construction began with a basic framework called “spangen” or “braces”. This consisted of a band of iron in a circle forming the rim, with two other iron bands crossing over to form the top of the helmet. The four gaps between the strips of the “spangen” were then filled with iron plates attached with iron rivets.

Although some Viking helmets were made of iron, this was often very expensive. They were also very heavy to wear. An iron helmet could weight up to 4kg (that’s about as heavy as a cat – though I don’t know if a cat is a good example – imagine wearing a cat on your head all day long!). Those who couldn’t afford iron might purchase a helmet made from hardened leather. The leather alternative would offer less protection but would be lighter to wear and more affordable.

Historians also believe Vikings may have padded out their helmets with sheepskin and attached a leather chinstrap to keep their headgear comfortable and secure. Some helmets were decorated with runes and other designs, whereas others were left blank.
Helmets were prized possessions for the Vikings and were often passed down from generation to generation. Because of this, very few complete Viking helmets have ever been found by archaeologists.
Make your own Viking helmet with this fun craft for kids:
Make a Viking Helmet:

You Will Need:
A4 White Card - approx. 4 sheets (we used House of Card & Paper 220gsm card)
Pencil
Ruler
Scissors - make sure you get an adult to help you when using scissors
Stapler -you’ll need an adult to help with this bit too! (We recommend using a full strip stapler like this Rexel Aquarius Stapler)
Staples
Tape Measure
A4 White Paper - approx. 3 sheets
Dark Silver, Light Silver & Bronze Metallic Paint (we used Perfect Ideaz Metallic Acrylic Paint)
Paint brushes
Holepunch
Glue Stick
Step 1 – Make Your Helmet Rim:


Cut 2 strips from your A4 card, 5cm wide and the full length of the card (approx. 29cm long)
Overlap the two strips of card together at the short (5cm) ends, grab your stapler and staple the two strips of card together.
Using the tape measure, measure around your head to get your head circumference (that’s the measurement all the way around your head). Make sure the tape measure is placed across your forehead when you measure.
Use your ruler to measure out your head circumference onto the stapled strips of card. Add an extra 1cm at the end so you have space to overlap the card and staple it together later.
Use your scissors to cut the stapled strips of card to your measurement.
Overlap the ends of the stapled strips of card by 1cm and use your stapler to staple them together into a circle. This is the rim of your helmet.
Pop the helmet rim onto your head to make sure it fits snuggly over your forehead and doesn’t fall down.
Find where you would like the front of your helmet to be and make a mark on the inside of the helmet rim to show this.
Step 2 – Make the Helmet Framework:


Measure and cut out strips, 3cm wide, running the full length of your A4 card. You should be able to measure and cut approx. 7 strips from each A4 sheet. We used 24 strips in total for our helmet.
Use your pencil and ruler to mark 1cm from both ends of each strip of card. This will be your overlap mark to staple each strip to the helmet rim.
Taking 1 strip of card, staple one of the short ends to the front of your helmet rim. Make sure to overlap the strip of card to the 1cm mark and that the strip overlaps into the inside of the helmet rim.
Using the same technique as above, staple the other end of the strip of card to the back of the helmet. Use your tape measure to measure around the helmet rim for more accuracy if required.
Take a 2nd strip of card. Continuing with the technique used above, staple both short ends to the helmet rim so that the 2nd strip of card crosses over the 1st strip of card to form a + shape on top of the helmet. Again, use your tape measure for more accuracy if you would like.
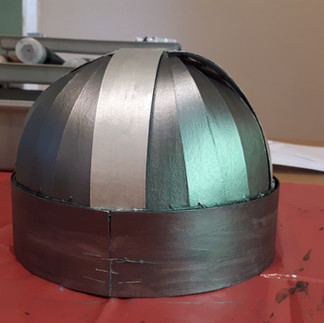
The framework or “spangen” of your helmet is now finished.
Step 3 – Fill in the gaps:


Continuing with the technique used above, fill in the gaps between the framework of your helmet by stapling strips of cardboard to the helmet rim.
Tips:
Position your strips from the underneath of the helmet so that the + shape of your framework is always shown on the top of your helmet
Overlap the strips lengthways rather than placing the strips side by side so that there are no gaps.
Make sure to start on either side of the front strip and work back to make sure both sides match.
Position the strips so that they stretch the full width of the circle. This will mean that strips that start in the gap on the front-left of the helmet rim will end on the back-right of the helmet rim.
Step 4 – Make the Face Guard


First make a template of your face guard design by taking a sheet of A4 paper and folding it in half width-ways.
Starting at the centre fold, draw half of your face guard design. Copy our design if you’d like, or create your own look.
With the paper folded in half, cut out your half face guard design. Take extra care around the eye holes – we recommend pushing a sharp pencil through the eye hole area first to start you off (or use your hole punch).
Open out the paper to reveal your full eye guard design. Check it fits your face and that you can see through both of the eye holes.
Using your paper design as a template, draw around your design onto a piece of white card.
Use scissors to cut your face guard design out of the card. Again, take extra care around the eye holes.
Step 5 – Make the Iron Rivets:


Use the hole punch to punch holes in a piece of white card.
Collect the circles punched out from the card to be your rivets.
Step 6 – Paint the Helmet Parts:


You will find details of the paint decoration we used below, but this is just a guide. You don’t need to copy our design – feel free to use your own artistic liberty here!
Paint the two strips forming the + shape on the top of the helmet in light silver paint.
Paint the helmet rim and the strips filling in the gaps on the helmet in dark silver paint. Make sure to push your brush in between the overlapped strips so that there are no white patches.
Paint the “brow” section of the face guard in bronze paint.
Paint the “nose” section of the face guard in dark silver paint.
Paint the “forehead” and “cheek” section of the face guard in light silver paint.
Paint the iron rivets with dark silver paint.
Step 7 – Glue it Together:


Position your eye guard on the front of your helmet, making sure the eye holes are below the helmet rim. Glue in place using a glue stick. If your card is particularly thick, you might have to hold the eye guard in place or use clothes pegs to hold it together while it dries.
Use a glue stick to glue your iron rivets onto your helmet. Rivets would have been used to fix the different iron sections together, such as where the face guard is attached to the helmet rim.
Step 8 – Decorate to Taste:


Add extra decoration to your helmet if you would like. We recommend researching images of Viking helmets for inspiration.
We added an entwined “runic” style design to the framework of our helmet. This was a really easy design to master. Click on the image above for a quick guide on how we created this.
You could also research Viking runes and write inscriptions on your helmet; perhaps your name, or the names of the Viking gods.


Here are some of the craft materials we used to create our Viking Helmet:
The above links are affiliate links. That means if you buy something through the links above, we will earn a few quid at no extra cost to you. But it’s worth pointing out, we choose these products because we genuinely recommend them.
If you’re under the age of 16, it’s important that you get a parent or guardian’s permission before you buy anything over the internet.


