Make Your Own Senet Board Game – Ancient Egyptian Craft Activity For Kids
- Sep 1, 2025
- 6 min read
Senet is one of the world’s oldest board games. It was played in Ancient Egypt thousands of years ago. Here, we’ll share how to craft your own Senet board game to play with your family and friends. If you’re not sure on the rules of how to play, check out our handy guide here.
Craft Your Own Ancient Egyptian Senet Board Game

You Will Need:
Two breakfast cereal boxes (One slightly larger so you can slot one inside the other)
Ruler
Pencil
Scissors
Glue
Paint (various colours including blue, white and black)
Paint brushes
White A4 paper
A black fine-liner pen (or a fine paint brush and a steady hand)
Air-dry modelling clay
Four lollypop sticks
Step 1 – Prepare the cereal boxes
First things first, you’ll need to turn the cereal boxes inside out so that you have a plain surface to paint and decorate. To do this, carefully peel apart the glued flaps on the bottom and side of the cereal boxes. Then fold all the seams of the cereal boxes in the opposite direction.


The large cereal box:
On the larger of the two boxes, use your scissors to cut away the flaps from the top end of the box so you have an open end to slide the smaller box into. Always get an adult to help you when using scissors.
Pop some glue on the bottom and side flaps (remember to glue the side that’s got the shiny printed design on it) and carefully stick the flaps together to re-form the box inside out.


The small cereal box:
On the smaller of the cereal boxes, use your ruler and pencil to measure out and draw a large rectangle on one of the two large panels of the box. Use your scissors to carefully cut out this rectangle. You’ll need a grown-up to help you with this bit because it can be a bit tricky. Tip: we found it helpful to carefully jab a hole through the centre of the rectangle first then cut out from there.
Next, re-form the small box inside out, just like you did with the larger box. But this time, you’ll also glue the top flaps of the box as well as the bottom and the sides.
Tip: You can fold a section of the top box flap back to make a little handle. This will come in handy when you’re pulling the box in and out from inside the larger box, like a little drawer.


Step 2 – Outline the playing board
Grab your large cereal box. Using your pencil and ruler, measure out and draw a grid that’s 3 squares tall and 10 squares wide.

Add numbers:
Next, add numbers 1 to 30 to the squares on the board. The top row of numbers should read 1-10 from left to right, the middle row of numbers should read 11-20 from right to left and the bottom row of numbers should read 21-30 from left to right. So, when playing, the player’s counters will move in a backwards “S” shape across and down the board.

You can also add Ancient Egyptian numbers too! They used a system of lines and arches to show numbers (very similar to Roman Numerals). Ones are represented by a single vertical line (I) and tens are represented with an arch (n). So the number 3 is shown III, the number 13 is shown nIII and the number 23 is shown nnIII. Check out the image to find out which symbols go where.
Tip: If you choose to add Ancient Egyptian numbers, don’t add them to squares 15, 26, 27, 28, 29 or 30. These squares are “special houses” and will have their own decorations (see below).


Add the “special houses”:
In senet, some squares (called “houses”) have special powers. Some send you back down the board like in Snakes and Ladders and some are safe spaces. Each special house has it’s own particular decoration:
Square 15 (the House of Life) is decorated with an ankh. This looks a bit like a cross with an oval on top!
Square 26 (the House of Happiness) is decorated with three lute-like hieroglyph symbols known as “nefer” meaning “good” or “beautiful”. They look like cricket bats!
Square 27 (the House of Water) is decorated with three wiggly lines, representing waves, one above the other.
Square 28 (the House of Three Truths) is decorated with three overlapping Ba-Birds. The bodies all merge into one but they have three long necks and heads on top and six legs poking out the bottom.
Square 29 (the House of Twos) is decorated with two gods in human form. We drew these as two people sitting facing towards each other, but you can draw them as stick people if it’s easier.
Square 30 (the House of Horus) is decorated with a falcon to represent the Ancient Egyptian god Horus. Similar to the Ba-Birds but just one this time, the falcon has a taller body and a shorter, chunkier neck.
Use your pencil to roughly sketch on the decorations for the special houses. We’ll go over them in black later.


Step 3 – Make the playing pieces
In senet, each of the two players has five playing pieces each. One player uses cone shaped counters and the other uses spool shaped counters.
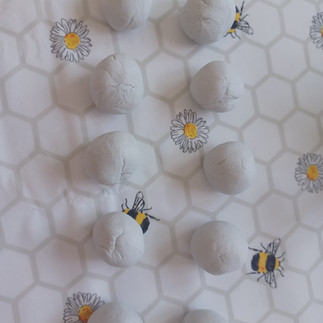
Grab your air-dry modelling clay and pull off a handful. Squish the clay in your hands until it becomes soft and warm, then roll it into a sausage. Following this, separate your clay sausage into 10 equal chunks. Each chunk needs to be no larger than one of the squares on your playing board.

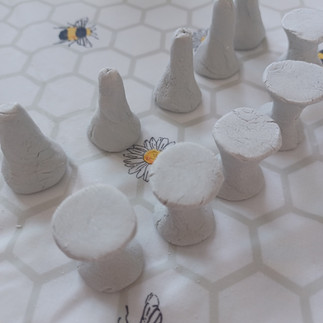


To make the cones:
Roll one of your clay chunks into a sausage. Then press one end of the sausage onto the table (make sure it’s covered with something - your parents won’t thank you if you get clay ingrained into their expensive oak dining table!) until this end of the sausage flattens into a disk shape. Squeeze and twist the other end of the sausage until it forms a point. Repeat this 4 more times until you have 5 cone pieces.


To make the spools:
Start with the same steps as the cones – roll a chunk of clay into a sausage then press one end into the table until it forms a flat disk. Now flip the clay over and press the other end into the table in the same way. Now you should have a flat disk at both ends of your sausage. Use your fingers to squeeze and twist the centre of the sausage (between the two disks) until you’re happy with your spool shape. Repeat 4 more times until you have 5 spool pieces.
Leave your clay to completely set. It might take a while (a few hours or even overnight!) for the clay to completely harden.


Step 5 – Paint and apply details to the game board
Grab your white paint and apply a thin coat of white to the playing area grid on your box. You should still be able to see your sketched details through the paint.
To add the board details, you can use some black paint and a fine brush (and a steady hand!) or use a black fine-liner pen. We used a combination of both, using the fine-liner for the grid lines and numbers and a paintbrush for the Egyptian numbers and special houses. Whatever tool you use, paint/draw over the rough lines you sketched on earlier to add the details to your senet game board.


Step 7 – Add decoration to your box
Next, decorate your small box and the rest of your large box with paint of your choosing. We went with a royal blue on the outer box and black for the inner box. You could add some drawings of hieroglyphs, the Ancient Egyptian gods, Egyptian animals like cobras, the river Nile, pyramids, pharaohs, mummies and more!
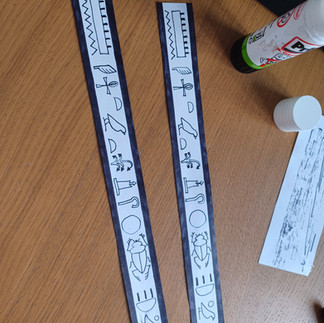
For our board, we copied some hieroglyphs from Tutankhamun’s cartouche onto some white paper and stuck it down the sides of the box. We also cut out a rectangle of white A4 paper and popped it inside the smaller box to cover the cereal branding.


Step 8 – Paint the throwing sticks
The Ancient Egyptians used throwing sticks instead of dice to work out the number of spaces they could move their playing pieces. Grab your four lollypop sticks and your favourite colour paint. In this straightforward step, paint one side of each of your lollypop sticks with your paint. Leave the other side of your sticks free of paint.


Step 9 – Paint the playing pieces
Once your playing pieces have completely set, you can use your paints to decorate them however you’d like. We recommend painting your cones one colour and your spools another. This will help the players to easily tell which playing pieces belong to them and which belong to their opponent.
Wait for the paint to dry then pop the playing pieces inside the small box and slide it inside the large box like a drawer. You can store your throwing sticks in here too.


Step 10 – Play the game!
Your senet board is finished and you’re ready to play a round of senet. If you’re not sure how to play, you can check out our handy guide to the rules of senet right here. Grab a friend and play a round or two (or twenty!). When you're finished pop your playing pieces and throwing sticks back in the drawer for later.


