Make Tutankhamun's Death Mask - Ancient Egypt Craft Activity For Kids
- Aug 11, 2025
- 8 min read
When Howard Carter uncovered the tomb of Pharaoh Tutankhamun in the Valley of the Kings in 1922, it turned out to be one of the most important archaeological discoveries in history! Not only was the tomb packed to the rafters with over 5000 pieces of Ancient Egyptian treasure, untouched for thousands of years, but Howard Carter also unearthed the body of the mummified remains of the Boy King, Tutankhamun himself. Inside his sarcophagus (a big ol’ stone coffin box), there were three more coffins, all placed one inside the other like a set of enormous Russian Dolls. The last coffin was made of solid gold and contained the mummy of Tutankhamun, with his famous funerary mask resting on his shoulders. This mask, made from two sheets of gold hammered together, is a masterpiece of Ancient Egyptian art and is famous throughout the world.
Now for the fun bit; we’ve put together a step-by-step guide on how to craft your own Tutankhamun funerary mask. Perhaps you’re planning to go as a mummy for Halloween and you want a bit of historical accuracy to your costume. Or your teacher has tasked you with creating something Ancient Egyptian for your school project. Or maybe you just like making pretty, shiny things! Well, we’ve got the just the craft for you:

Make Your Own Tutankhamun Funerary Mask:
You Will Need:
Large sheet of thick cardboard (around 50cmx50cm in size)
Cardboard mask
Pencil
Rubber
Scissors
Toilet roll tube
Sticky tape
Strips of newspaper
Strips of white paper
PVA glue
Ruler
Paint brushes
Acrylic Paint (in gold, light blue, dark blue, orange, black, white)


Step 1 – Draw the base of the mask
Place your mask in the centre of your sheet of thick cardboard. Using your pencil, draw around the mask like a stencil. Remove the cardboard mask and you should have the outline of your mask on the cardboard sheet.
To attach the mask to the cardboard when you cut it out, you’ll need some tabs. These tabs will fold in behind the mask to keep it attached. To create these tabs, draw some rectangles jutting in towards the centre of your stencilled mask outline. You don’t need tabs on the chin section of your mask.
Next, draw the shape of Tutankhamun’s headdress (called a Nemes) around the outside of your mask. The Nemes has a bit of an arched horse-shoe shape with slimmer sections coming down over the shoulders at the bottom. If you’re not sure, check out the pictures for reference.

Step 2 – Draw the uraeus
On a smaller piece of cardboard, draw the shape of the cobra and the vulture on the forehead of Tutankhamun’s headdress (this is called a uraeus). Our uraeus was around 12cm tall and 10cm wide.
Like with your headdress, you’ll need some tabs on the Uraeus so that you can attach it to the mask. At the base of the Uraeus, draw two long tabs – one at the bottom of the cobra and one at the bottom of the vulture. Our tabs were around 9cm long.
Note: The Uraeus won’t be glued onto the mask until the end of the craft after everything has been painted. You’ll need to keep it separate until then.


Step 3 – Cut out the mask base
Getting an adult to help you, carefully cut out the shape of your headdress using your scissors. Cut around each tab and fold them inwards along the stencilled mask line.
Next, take your toilet roll tube and make a cut down three quarters of the length of the tube from one hole towards the other. Don’t cut all the way to the end! This will be the beard.
Finally, cut out the Uraeus. It might be a little tricky to cut out the holes in the middle of the Uraeus. Make sure to get an adult to help you with these bits.


Step 4 – Stick the base of your mask together
Next, using your sticky tape, stick all of the pieces of your mask base together.
Start by placing the cardboard mask in the centre of your headdress. The tabs you cut out earlier should nicely fold backwards into the back of the cardboard mask. Pop some tape on these tabs to stick the headdress and the mask together.
Tip: We glued some extra strips of cardboard onto the back of the headdress to give it some extra support and make it sturdier.
Next, place the sliced open end of the toilet roll tube onto the chin of your mask (with the cut facing towards the back). Tape this on to create the beard.
Note: Don’t stick on the Uraeus just yet, we’ll add it at the end after the mask has been painted.


Step 5 – Papier Mache:
Mix the PVA glue with some water (you want around half glue and half water in your pot to a 1:1 ratio). Taking your strips of newspaper, coat them in the glue/water mix and paste them onto your mask. Coat the entire mask in glue/water-coated newspaper, making sure to tuck the newspaper in around any corners and gaps. Then leave the mask to dry fully.
Don’t forget to papier mache the Uraeus separately too. Don’t papier mache the tabs at the bottom of the two creatures, these need to stay flexible for sticking the uraeus to the headdress later on.
Once dry, add another layer of papier mache. The more layers you add, the sturdier your mask will be. We did three layers of papier mache in total.
Tip: Use plain white paper for your final papier mache layer. This will give you a plain surface to paint on.


Step 6 – Draw on the headdress stripes:
Using your pencil and ruler, measure out the stripes on the headdress.
The stripes on the shoulder panels and down the sides of the face will need to be horizontal. Measure out the stripes at around 1-1.5cm wide and then draw them in with your pencil and ruler.
The stripes on the top of the headdress curve vertically upwards. Draw a horizontal band reaching across the forehead of the mask from ear to ear. The stripes will start on the forehead band and curve up and out towards the top of the headdress. Check out our design in the pictures for reference. Roughly measure these stripes with your ruler and then draw them in with your pencil. If things don’t look quite right, you can always grab a rubber and make any changes you need.


Step 7 – Draw on the facial details
Using your pencil, draw a semi-circular ear shape on both sides of the mask (where it meets the headdress), in line with the eyes.
Next, draw on the eye “kohl” details. The kohl looks a bit like eyeliner surrounding the eye and reaches out towards the ears.
Then add the eyebrows above the eyes, again reaching out towards the ears.
Use your rubber to erase any errors and amend as needed.
Next, draw yourself a chin line. To do this, using your pencil, draw a horizontal line across the chin, where the mask meets the toilet roll tube. We’ll add further details to the beard after we’ve painted the base colour.

Step 8 – Draw on the uraeus details
Using your pencil, sketch the details of the cobra and the vulture onto the uraeus. The vulture is on the left and the cobra is on the right, with the cobra’s tail winding around behind them. Remember you can use your own artistic license. Don’t worry if it doesn’t look exactly like the original. You can check out the images of how we sketched ours for some inspiration if you’d like!


Step 9 – Paint the base colours for the headdress, face and beard
First, using your gold paint, paint every other stripe around the headdress. We found it easiest to paint the vertical stripes on the forehead first, then paint down the sides of the headdress. Only paint as far as where the headdress meets the mask.
Next, using your gold paint again, paint the face of the mask. Don’t paint over the eyebrows or eyeliner around the eyes. At this point you’ll need to paint over the ear area too. Paint all the way up to the chin line with gold paint.
Following this, grab your dark blue paint and paint the other stripes around the headdress and the eyeliner and eyebrows on the mask.
Finally, using your light blue paint, paint the beard from the chin line downwards, covering the entire toilet roll tube.


Step 10 – Paint details on the headdress and face
Once your base paint colours have completely dried, you can add extra details to your design. You can use your own artistic license here, but here’s what we did to give you some inspiration:
We painted white highlight lines on blue stripes of the headdress to make them look shinier and added white paint around the centre edge of the eyes to make them look wider.
We painted a thin line of dark blue paint across the forehead of the mask, showing the edge of the band of the headdress.
Finally, we used black paint to paint on the ears.


Step 11 – Paint details on the beard
First, using your pencil, you’ll need to draw on the beard details. This includes a zig-zagging line with panels down the centre of the beard and a striped “nub” right on the end of the beard.
Grab your dark blue paint and carefully paint along all of the lines you’ve just sketched with your pencil.
We also added gold paint to these lines to make them pop, along with some more highlight lines in white paint, just like we did with the blue headdress stripes earlier.

Step 12 – Paint the uraeus
Again, you can use your artistic license on this part – go wild with your paints and make your mask’s uraeus look awesome. Here’s what we did for some inspiration:
We painted orange and light blue panels on the body of the cobra, just like on Tutankhamun’s uraeus.
We used black for the face of the cobra and the beak and eyes of the vulture. Then we used dark blue to add the details.
Next, we painted everything else in gold.
Once this had dried, we added some extra details in a lighter and darker gold. To make the lighter and darker gold paints we mixed it with a little white paint or a little black paint, respectively. We added dots and lines to the tail to make it look scaley, plus some lines along the necks of both creatures and some shapes on the cobra’s hood.


Step 13 – Attach the uraeus to the headdress
First, create three folds along the tabs at the base of the uraeus. The first fold will be at the point where your vulture and cobra designs end and the other two folds will be equal distances apart along the remaining length of the tabs. You should now have three panels on your uraeus tabs. The first panel (closest to your design) will stick the uraeus to the mask and the third tab (furthest from your design) will stick to the back of the uraeus to hold it upright.
Pop some glue on the first panel of each tab and stick it down onto the section of the headdress above the forehead of the mask.
Next pop some more glue on the inside of the third panel on each tab and stick to the back of your uraeus design to hold it upright.


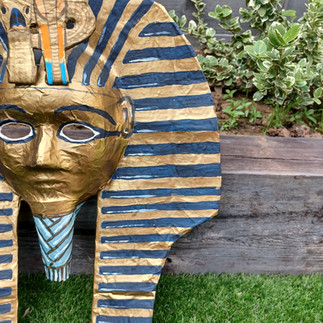


Step 14 – Show off your mask
You’re all finished! Well done you! Pop your Tutankhamun mask on your face and go show it off to all your family and friends!
Fancy doing some more Ancient Egyptian craft and learning activities? Us too!


