History of the Christmas Wreath - Craft Your Own Wreath
- Dec 8, 2020
- 5 min read
Updated: Mar 31, 2025

Wreaths are an ornamental decoration often made from an assortment of evergreen leaves, twigs, or flowers arranged in a ring. They are commonly associated with Christmas.
During the 16th Century, Northern & Eastern Europeans had begun the Christmas tradition of bringing evergreen trees into their homes (find out more about the ancient origins of the Christmas tree here). They often chopped bits off the tree to make it neater or to fit it into a room. To avoid excess waste, they would create wreaths from the branches they had pruned from the tree. Alongside this, one of the most well-known wreath traditions began; the Advent Wreath. In this Christian tradition, the Advent Wreath is placed flat on a surface and contains 4 (and sometimes 5) candles that are lit at intervals throughout Advent.
But the history of the wreath dates back much further than this and is associated with a wide variety of cultures.
The Ancient Egyptians made wreaths called Chaplets by sewing flowers into a band that they tied around their heads. Occasionally, they would also place a wreath headdress onto a mummy to represent victory over death in the afterlife. The Ancient Greeks also used wreaths.
They would award wreaths made from olive, pine, laurel, or celery branches to victorious athletes at the Panhellenic Games (including the Olympic, Pythian, Nemean, and Isthmian Games). They would also give wreaths as prizes to successful poets and speakers.
But how did the wreath become associated with Christmas? This can be dated back to Winter Solstice and Yule celebrations.
During the 7-day festival of Saturnalia (running from 17th to 23rd December), Roman people would give holly wreaths as gifts to one another or decorate their homes with them. Later, ancient Germanic and Scandinavian people would use wreaths to celebrate nature and the return of the sun during the Winter Solstice. Historians even suggest that during their Yule celebrations, the Vikings would set an enormous evergreen wreath on fire and roll it down a hill like a wheel!
Find out how to make your own Christmas wreath with this fun craft activity for kids. Though we wouldn’t recommend setting it on fire and rolling it down a hill…

Make A Christmas Wreath:
You Will Need:
Thick/Corrugated Cardboard
Pencil
Drawing Pin (Optional)
Green Garden Twine - We used Draper Garden Twine
Scissors
Paint (Green & Red) - We used Daler-Rowney 12 Acrylic Paint Set
Paint Brushes
PVA Glue - We used Craft Planet PVA Glue
Dark Green Tissue Paper/Paper Napkins - We used Merrimen Tissue Paper in Dark Green
Light Green Tissue Paper/Paper Napkins - We used Amscan Kiwi Green Lunch Napkins
Thin Red Ribbon - We used Vatin 10mm Red Ribbon
Buttons (Red & Green, in varying sizes) - We used Zawtr Mixed Craft Buttons
Glitter Glue - We used Crayola Glitter Glue Pens in Silver
Method:


Step 1 – Create Wreath Base:
Draw a wreath shape onto the cardboard. The large outer circle should be approximately 30cm in diameter and the small inner circle in the centre approximately 14cm in diameter
Keep your circles even all the way round by tying some twine around your pencil and pinning the other end in the centre of the cardboard to make a compass. Hold the pin with one hand then draw the circle with your pencil with the other hand, making sure to keep the twine pulled tight at all times
Use scissors to cut out your wreath. Get an adult to help you to cut out the centre circle without cutting through the wreath
Use PVA glue to stick more layers of cardboard to your base to make your wreath sturdier.
Paint your entire wreath base in green paint. Optional – add different shades of green. Leave to dry


Step 2 – Edge Your Wreath Base:
Coat the outside edge of the cardboard in PVA glue
Stick green twine to the PVA glue, running it all the way around the edge of the wreath
Add two or three more layers of twine around the edge, adding more glue between each layer
Finish by covering all of the twine around the edges with a good layer of PVA glue
Repeat for the inside edge of the wreath.


Step 3 – Create Wreath Leaves:
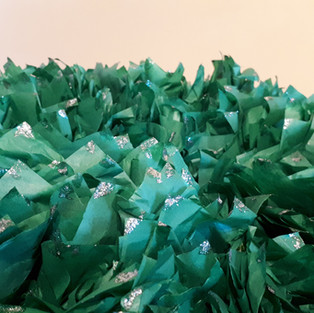
Cut squares of dark green tissue paper (approx. 10cm x 10cm) and light green tissue paper (approx. 7cm x 7cm)
Take 3 or 4 square sheets of dark green tissue paper and layer them on top of one another so the corners don’t overlap
Place a finger into the centre of the squares then use your other hand to gather the tissue paper around your finger. Remove your finger and twist the gathered tissue paper together to create a flower petal effect
Repeat the previous two steps to create lots of green tissue paper flowers. We created about 60 dark green flowers and 20 light green flowers.


Step 4 – Stick Wreath Leaves to the Base:
Coat a small area of your wreath base with PVA glue
Stick your tissue paper flowers onto the PVA glue by pressing down gently in the centre of the flower with your finger
Continue sticking your tissue paper flowers to your wreath, adding more glue to the wreath base as you go
Make sure to pack your tissue paper flowers tightly together when you stick them down.


Step 5 – Add glitter:
Use a fine paint brush to add a small amount of glitter glue to the tips of each green tissue paper petal
Also, add a layer of glitter glue to the front of each of your red & green buttons to make them sparkle
Leave to dry.


Step 6 – Make a Bow:
Draw the outline of a bow onto your corrugated cardboard (approx. 13cm wide by 10cm tall)
Cut out your cardboard bow, paint it red all over & leave to dry
Using PVA glue, stick down overlapping lengths of red ribbon, leading from the outside edge of the bow to where the knot would be in the centre
Once all of the bow has been covered in ribbon, glue a large red glittery button where the knot would be in the centre of the bow.
Once dry, neaten up the edges of the bow by trimming off any sections of ribbon sticking out over the edges of the cardboard.


Step 7 – Decorate Your Wreath:
Add a layer of PVA glue to the back of your bow and gently stick it to the wreath (positioned just below the centre of the hole)
Glue your glittery buttons to the wreath. Add a layer of glue to the back of the button then gently press it into position on the wreath leaves. Make sure to glue the red buttons together in small clusters to make them look like berries.


Step 8 – Add a Hanging Loop:
Get an adult to help you to pierce a hole in the cardboard at the top of your wreath
Thread a length of red ribbon through the hole and tie the ends together to form a loop to hang your wreath from
Hang your Christmas wreath up for everyone to see!


If you liked what you just read, why not consider donating to support the blog? It's thanks to awesome people like you that we are able to continue creating content for this History Resource.
Help keep these resources free by donating today! Any amount is greatly appreciated.
Here are some of the craft materials we used to create our Wreath craft:
The above links are affiliate links. That means if you buy something through the links above, we will earn a few quid at no extra cost to you. But it’s worth pointing out, we choose these products because we genuinely recommend them.
If you’re under the age of 16, it’s important that you get a parent or guardian’s permission before you buy anything over the internet.